### Valden: Heat Pump Controller v1.x
The Valden Heat Pump controller is a platform to precisely control heat
pumps. Controller can be easily used for newly designed heat pumps (HPs), including series, as repair controller or as control system for experiments with refrigeration equipment.
!!!GENERATE TOC HERE!!!
## Specs
- 12V 0.5A DC power supply,
- 230V output,
- up to 12 T sensors, -55..+125 °C range,
- 4 relays: Compressor, Hot CP or Air Fan, Cold CP or Air Fan, Crankcase Heater,
- 2 inputs: Hot and cold side refrigerant over/under pressure NC sensors,
- 6 pin EEV connection: 4 * coils + 2 * 12V,
- LED indication,
- control via remote display or local Serial (UART 5V),
- automatically turns on/of system when heating required,
- built-in protections: cold start, overheat, short-term power loss, power overload, ground loop freeze and compressor protection against liquid.
## Refrigeration schemes supported
- Heat Pump (HP) with Electronic Expansion Valve (EEV),
- HP with capillary tube or TXV,
- EEV only controller.
## Installations supported
- Indoor: a house or technical building with a more or less stable temperature,
- Outdoor: harsh climatic conditions taken into account and tested down to minus 32°C.
## Changelog and history
- 2018: PCB prototype, first real installation,
- 2019: 2-layer PCB, through-hole components, integrated buttons and display,
- 2019: controller redesigned taking into account development and operating experience,2-layer PCB, SMD
- 2019-2021: installations, development, tests, revisions, redisigns
- 06 Feb 2021: product is technically complete and ready for customers to use. Documentation and release stage.
## Get your own copy and PCB assembly
- download the PCB gerber file, *Gerber.zip*
- find in Google, [where to order a printed circuit board](https://www.google.com/search?q=order+pcb+gerber) (keywords: order pcb gerber), place an order,
- order electronic components, see BOM (Bill Of Materials) list, *PCB_BOM.html* ,
- solder electronic components. {- assembly instructions here-}
## Firmware upload
The process is the same as for others Arduinos:
- connect USB-> UART converter,
- start Arduino IDE,
- open the firmware file,
- select board and MCU in the Tools menu (hint: we are using "mini" board with 328p MCU),
- press the "Upload" button in the interface and "Reset" on the Arduino.
For arduinos with old bootloader you need to update it. (Tools-> Burn Bootloader).
For successful compilation, you must have "SoftwareSerial", "OneWire" and "DallasTemperature" installed (see Tools -> Manage Libraries).
As a first try it's enough to simply upload firmware without any tunings. Think of it as of commercial closed-source controller, where you cannot change internal options.
## Self-tests
QA tests are available to test the assembled board.
Self-test helps you check relays, indicators, speaker and temperature sensors.
To run a self-tests:
- uncomment this 3 defines in source code header,
```c
//#define SELFTEST_RELAYS_LEDS_SPEAKER //speaker and relays QA test, uncomment to enable
//#define SELFTEST_EEV //EEV QA test, uncomment to enable
//#define SELFTEST_T_SENSORS //temperature sensors QA test, uncomment to enable
```
- upload firmware,
- connect 12V power supply.
Video {- demostration "How self-tests works":-}
To check EEV, you can use a stepper motor as shown in the video. If you are testing a real EEV, it should be closed after the first "beep" and partially opened after the second "beep".
To check temperature sensors connectors prepare one array of sensors. Connect it to all sensors connectors one-by-one and check results in a serial console.
{-Photo: PCB with connected arrays of sensors (I have enough sensors, so all 3 arrays are connected except Ts2 and Treg) -}
{-Screenshot: serial console with temperature readings: -}
## Wiring and installation
Wiring is very simple despite the many connections:
Phases (1st wire in electrical cables):
- connect the "power inlet" wire to one of the "phase" connectors,
- and connect the second "phase" connector to the AC input of the 12V power supply,
- connect the "Compressor" relay output to the Compressor input,
- connect the relay output "Hot CP" to the input of the Hot Circulation Pump (pump of the water floor heating system or the fan input of the indoor unit if you are using an air system),
- connect the relay output "Cold CP" to the input of the Cold Circulation Pump (ground loop pump for geothermal systems or the inlet of the outdoor unit air fan if you are using an air system),
- when using a compressor heater: connect the "Crankcase heater" output to the heater cable input (highly recommended for outdoor installation and year-round use)
Neutral (2nd cable in electrical cables),
- connect all the second wires to the "neutral" connectors on the board.
{-Photo of HV connections-}
Crimp and connect low-voltage connectors:
- SCT013 sensor (the only low-voltage device in the circuit with interchangeable contacts), connect and install on the phase inlet wire,
- RS485 through a wire of the desired length to the remote control display (if used, another control method is a local computer with a USB-UART converter, you may like it for the first time). Note that A is connected to A in the display, B to B and GND to GND,
- you can power the display from a 12V controller, the board has 12V and GND secondary pins,
- EEV to EEV connector,
- T sensors to T sensors connectors,
- connect the outputs of the pressure sensors: 1st wires together to the right pin, 2nd cold side wire to the left terminal, 2nd hot side wire to the middle terminal; use the dummy when pressure sensors are not in use.
You may prefer to solder the wires over using connectors. But in this case, it will be more difficult to disassemble the system if you want to change something. The choice is yours.
{-Photo: power wire + SCT013-}
{-Photo: T sensors with abbreviations and full names-}
{-Photo: RS485 and 12V power for display-}
{-Photo: all together-}
## Control and usage: serial console
This is a first interface to Heat Pump controller you'll see after uploading firmware (Tools->Serial Monitor).
The console itself is very simple, several commands are available. Type in command, press "Send". Help and hotkeys:
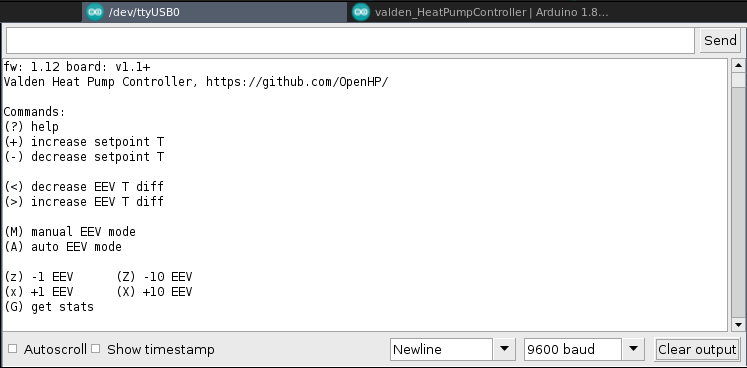
Every **HUMAN_AUTOINFO** times you'll see stats. For example soon after comressor starts you'll see something like this:

At this example: "hot in" ~30 °C, compressor ~80 °C and so on. Heat Pump (HP, compressor) ON, Hot water pump ON, Cold water pump ON. Power consumption 980 watts.
Abbreviations: refer to Appendix A below.
Also you'll see diagnostic messages here.
## Control and usage: remote control display
{-There are 2 ways to control heat pump-}
{-connection-}
qwer
## Control and usage: diagnostic display
{-desc 2-}
link
## Starting up the heat pump system for the first time and charging refrigerant
This is not a hard part, but if you don't have experience it will take time.
You have performed a pressure test and vacuumated your system. It's time to charge.
Let's say you don't know how to calculate the amount of refrigerant in a newly built system:
- charge a small amount (for example 300 g) of refrigerant,
- start the heat pump,
- at this moment the suction temperature (according to the suction pressure on the pressure gauge) will be about -20 ...- 40 ° C,
- for single-component refrigerants: slightly open the valve of the HVAC gauge manifold to start adding refrigerant through the gas phase on the cold side,
- for multi-component refrigerants: turn over the refrigerant cylinder, VERY SLIGHTLY open the HVAC manifold valve to start adding a VERY LITTLE amount of refrigerant through the liquid phase,
- carry out charging until the suction temperature (according to the suction pressure on the manometer) is ~ 10 ... 15 ° C lower than the temperature of the heat source (example: the temperature at the inlet of the mixture of water and antifreeze from the closed ground loop is + 8 ° C, so the suction temperature should be -2 ..- 7), then close the manifold valve,
- at every step check the discharge pressure: it should not be too high compared to the temperature from the discharge sensor (Tbc) of the hot side,
- wait for the system to heat the target to a more or less stable temperature, add refrigerant while temperature increases (and suction decreases),
- stop if you are sure that the heating process is now proceeding very slowly,
- carry out the final charge when the system is stable and the heat pump stops normally (setpoint is reached), this may take 12 hours or more, and now the target difference between the suction pressure temperature and the temperature from the T sensor should be 3 ... 6 ° C.
This algo is good and safe both the first time and as a starting point. As you gain experience, you will get yours much easier and faster.
Also use "manual EEV mode" during charging process.
{-?manifold photos with comments?-}
## Hints
For more information about Heat Pumps look at [Wikipedia about HP](https://en.wikipedia.org/wiki/Heat_pump).
If you are interested in questions like "how refrigeration systems works" read Patrick Kotzaoglanian books.
If you want more technical details, sophisticated scmemes, "how EEV can be driven by temperature" diagrams, etc. refer to vendors manuals (you can find a lot in Alfa Laval brochures, Danfoss guides, and so on).
For refrigerants and oils types comparison see wiki.
## Personal experience
Note that the SCT013 sensor and the current monitoring scheme cannot be used for accurate measurements and accurate COP calculations. Use wattmeter for accurate power measurements.
Measuring the temperature of a warm floor with sensor at one point is a bad idea - it's better to deal with temperature of the "hot in" water coming from all over the floor, as implemented in firmware.
The weather-dependent (both outdoor and indoor temperature dependent) system does not work fine for 30-150 m2 buildings. The system turns out to be difficult and works bad due to unpredictable ventilation. And also due to the unpredictability of heat emitted in the house by other sources.
I tried the scheme with a flooded evaporator in 2019 and found it extremely problematic, then refused to use it.
Deep regeneration schemes are useful only for some refrigerants and only in certain temperature ranges. I also tried deep regeneration, I was convinced that the theory coincides with the practice and then also refused this idea.
In general, it is possible by complicating the refrigeration scheme to win somewhere 1%, somewhere 3%, but all this leads to significant time and money costs, compared to not very much profit.
Summary: If you want experiments - Experiment. Want reliably and quickly - make system simple.
## License
GPLv3.
This product is distributed in the hope that it will be useful, but WITHOUT ANY WARRANTY; without even the implied warranty of MERCHANTABILITY or FITNESS FOR A PARTICULAR PURPOSE. See the GNU General Public License for more details.
## Author
gonzho АТ web.de (c) 2018-2021
## Appendix A: T sensors abbreviations
Abbreviations used in the documentation and firmware.
Main sensors:
| Abbr. | Full name |
| ----- | -------------------- |
| Tae | after evaporator |
| Tbe | before evaporator |
| Tci | cold side "input" |
| Tco | cold side "output" |
| Tbc | before condenser |
| Tac | after condenser |
| Thi | hot side "input" |
| Tho | hot side "output" |
| Tcrc | crankcase (compressor itself)|
Additional sensor used in "swiming pool heater" or "water tank heater" schemes, check **SETPOINT_TS1** option:
| Abbr. | Full name |
| ----- | -------------------- |
| Ts1 | additional sensor1 |
Additional sensors, disabled and not used by default:
| Abbr. | Full name |
| ----- | -------------------- |
| Treg | regenerator temperature|
| Ts2 | additional sensor2 |
## Appendix B: Diagnostic and status messages
**LastStopCause messages. Why system was stopped**
| Message | description |
| ------------- | ------------- |
| **Normal_stop** | Normal stop, i.e. setpoint sensor temperature > setpoint, so no need to heat anymore. |
| **P.WtMax:_WATTS_** | Protective stop. Overcurrent, double check your system, then **MAX_WATTS** and **POWERON_HIGHTIME** options. |
| **P.W.wattMIN** | Protective stop. Power consumtion abnormally low (Setp.** | "Hot in" temperature > setpoint, so no reason to start. |
| **#Ts1>Setp.** | "Ts1" temperature > setpoint, so no reason to start, see **SETPOINT_TS1** option to switch betwees Thi and Ts1 as setpoint sensor. |
| **HWP_OFF** | Setpoint sensor temperature > setpoint, so after some time (**HOTCIRCLE_STOP_AFTER** option) hot side pump powered off and gone to power saving mode. |
| **HWP_ON_by_ev** | Hot side pump started after power saving. See **HOTCIRCLE_START_EVERY** option. |
| **#HotPrp:_seconds_** | Hot side pump is on, waiting for T stabilisation. Countdown, seconds. See **HOTCIRCLE_CHECK_PREPARE** option. |
| **#HotSlp:_seconds_** | Hot side pump in power save mode (sleeping). Waiting for next startup. Countdown, seconds. See **HOTCIRCLE_START_EVERY** option. |
| **#HPSlp:_seconds_**" | Compressor: pause between starts. Countdown, seconds. **MINCYCLE_POWEROFF** option.|
| **#CPpStart** | Cold side pump started. |
| **#CPp:_seconds_** | Cold side pumping. Preparing system to start compressor. Countdown, seconds. **COLDCIRCLE_PREPARE** option. |
| **#Tho>Max** | "Hot out" temperature is too high. See **T_HOT_MAX** option. |
| **#Thi>Max** | "Hot in" temperature is too high. , see **T_HOT_MAX** option. |
| **#CaseCold** | Compressor crankcase temperature is too low. Can't start. This situation occurs if the outdoor installation when AC power was lost for a few hours. Wait, while the crankcase heater stabilizing your compressor temperature. See **T_CRANKCASE_MIN** option. |
| **#CaseHot** | Compressor is still overheated, waiting. See **T_CRANKCASE_MAX** option. |
| **#TaeMax** | "Before condenser" temperatire is too high. Overheat protection. See **T_BEFORE_CONDENSER_MAX** option. |
| **#Tci hotcircle_check_prepare or HP will go sleep cycle instead of start
#define DEFFERED_STOP_HOTCIRCLE 1200000 //after compressor stop: wait 20 minutes, if no need to start compressor: stop hot WP; value must be > 0
#define HOTCIRCLE_START_EVERY 2400000 //while pauses: pump on "hot side" starts every 40 minutes (by default) (max 9999 seconds) to circulate water and get exact temperature reading , option used if "warm floor" installation (Thi as setpoint)...
#define HOTCIRCLE_CHECK_PREPARE 300000 //while pauses: ...and wait temperature stabilisation 5 minutes (by default), after that do setpoint checks...
#define HOTCIRCLE_STOP_AFTER (HOTCIRCLE_CHECK_PREPARE + COLDCIRCLE_PREPARE + 30000) //...and then stop after few minutes of circulating, if temperature is high and no need to start compressor; value must be check_prepare + coldcircle_prepare + 30 seconds (or more)
```
EEV options
If you are using capillary tube or TXV: simply skip next section
Depending on how many milliseconds are allocated per step, the speed of automatic tuning will change.
Remember that you'll see refrigeration system reaction on every step not immediately, but after few minutes, sometimes after tens of minutes.
```c
#define EEV_MAXPULSES 250 //max steps, 250 is tested for sanhua 1.3
//steps tuning: mulliseconds per fast and slow (precise) steps
#define EEV_PULSE_FCLOSE_MILLIS 20 //(20 tube evaporator) fast closing, closing on danger (milliseconds per step)
#define EEV_PULSE_CLOSE_MILLIS 60000 //(50000 tube evaporator) accurate closing while the compressor works (milliseconds per step)
#define EEV_PULSE_WOPEN_MILLIS 20 //(20 tube evaporator) standby (waiting) pos. set (milliseconds per step)
#define EEV_PULSE_FOPEN_MILLIS 1400 //(1300 tube evaporator) fast opening, fast search (milliseconds per step)
#define EEV_PULSE_OPEN_MILLIS 70000 //(60000 tube evaporator) accurate opening while the compressor works (milliseconds per step)
#define EEV_STOP_HOLD 500 //0.1..1sec for Sanhua hold time (milliseconds per step)
#define EEV_CLOSEEVERY 86400000 //86400000: EEV will be closed (zero calibration) every 24 hours, executed while HP is NOT working (milliseconds per cycle)
//positions
#define EEV_CLOSE_ADD_PULSES 8 //read below, additional steps after zero position while full closing
#define EEV_OPEN_AFTER_CLOSE 45 //0 - set the zero position, then add EEV_CLOSE_ADD_PULSES (zero insurance, read EEV guides for this value) and stop, EEV will be in zero position.
//N - set the zero position, than add EEV_CLOSE_ADD_PULSES, than open EEV on EEV_OPEN_AFTER_CLOSE pulses
//i.e. it's a "waiting position" while HP not working, value must be <= MINWORKPOS
#define EEV_MINWORKPOS 50 //position will be not less during normal work, open EEV to this position after compressor start
//temperatures
#define EEV_PRECISE_START 7.0 //(8.6 tube evaporator) precise tuning threshold: make slower pulses if (real_diff-target_diff) less than this value. Used for fine auto-tuning
#define EEV_EMERG_DIFF 1.7 //(2.5 tube evaporator) liquid at suction threshold: if dangerous condition occured: real_diff =< (target_diff - EEV_EMERG_DIFF) then EEV will be closed to min. work position //Ex: EEV_EMERG_DIFF = 2.0, target diff 5.0, if real_diff =< (5.0 - 2.0) then EEV will be closed to EEV_MINWORKPOS
#define EEV_HYSTERESIS 0.5 //(0.6 tube evaporator) hysteresis, to stop fine tuning: must be less than EEV_PRECISE_START, ex: target difference = 4.0, hysteresis = 0.3, no EEV pulses will be done while real difference in range 4.0..4.3
#define EEV_TARGET_TEMP_DIFF 3.6 //(3.6 tube evaporator) target difference between Before Evaporator and After Evaporator, the head of whole algorithm
//additional options
#define EEV_REOPENLAST 1 //1 = reopen to last position on compressor start, useful for ordinary schemes with everyday working cycles, 0 = not
#define EEV_REOPENMINTIME 40000 //after system start: min. delay between "min. work pos." (must be > 0 in this case and > waiting position) set and reopening start
//#define EEV_MANUAL //comment to disable, manual set of EEV position via console; warning: this option will stop all EEV auto-activities, including zero position find procedure; so this option not recommended: switching auto/manual mode from console after startup is a better way
//do not use next option untill you're not really need it
//#define EEV_DEBUG //debug, usefull during system fine tuning, works both with local serial and RS485_HUMAN
```
Communication addresses
```c
const char devID = 0x45; //used only if JSON communication, does not matter for modbus and Valden display https://github.com/OpenHP/
const char hostID = 0x30; //used only if JSON communication, not used for modbus
```
Last option
```c
#define MAX_SEQUENTIAL_ERRORS 15 //max cycles to wait auto-clean error, ex: T sensor appears, stop compressor after counter exceeded (millis_cycle * MAX_SEQUENTIAL_ERRORS)
```
## Author
gonzho АТ web.de (c) 2018-2021